
Printing Estimates
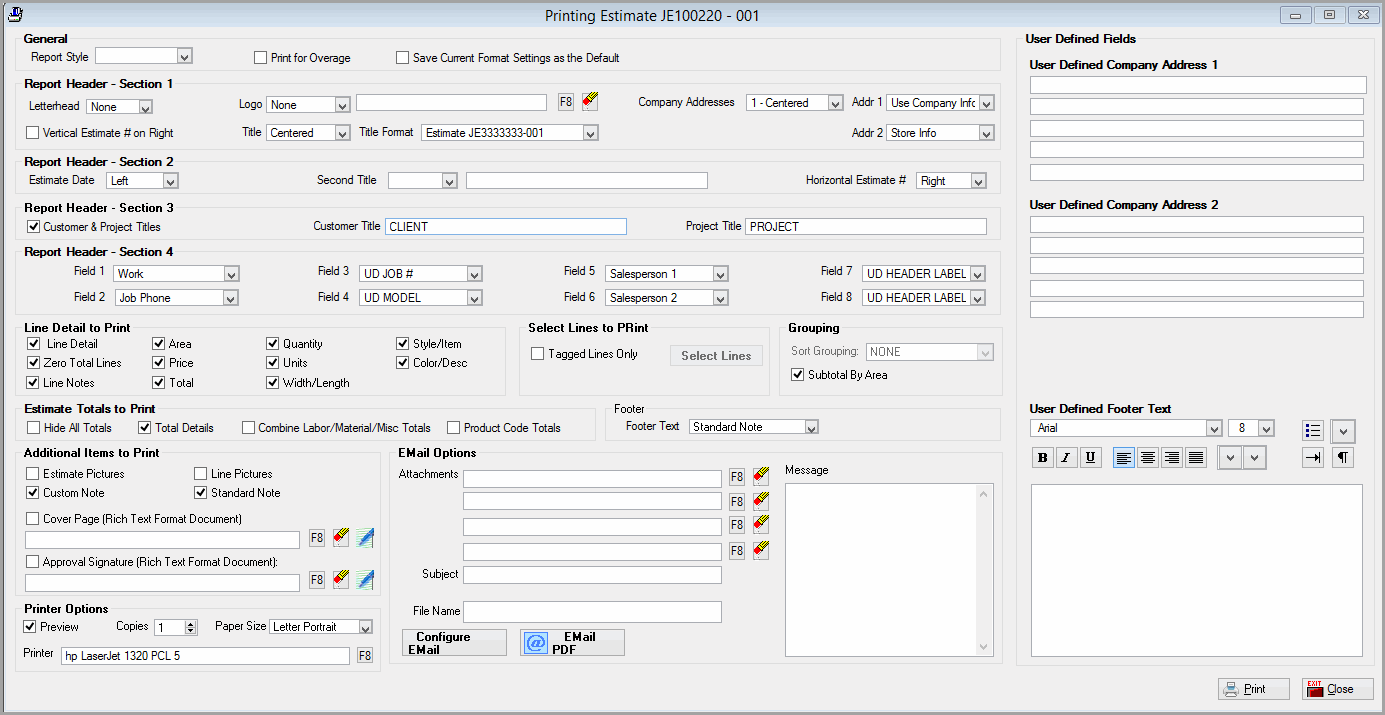
An estimate can be printed from two places in Bid Pro.
1. From the estimate list screen, highlight the correct estimate and click on the Printer icon 
2. Or, open the desired estimate and click on the Print Estimate button  .
.
Estimate Field Explanations
General
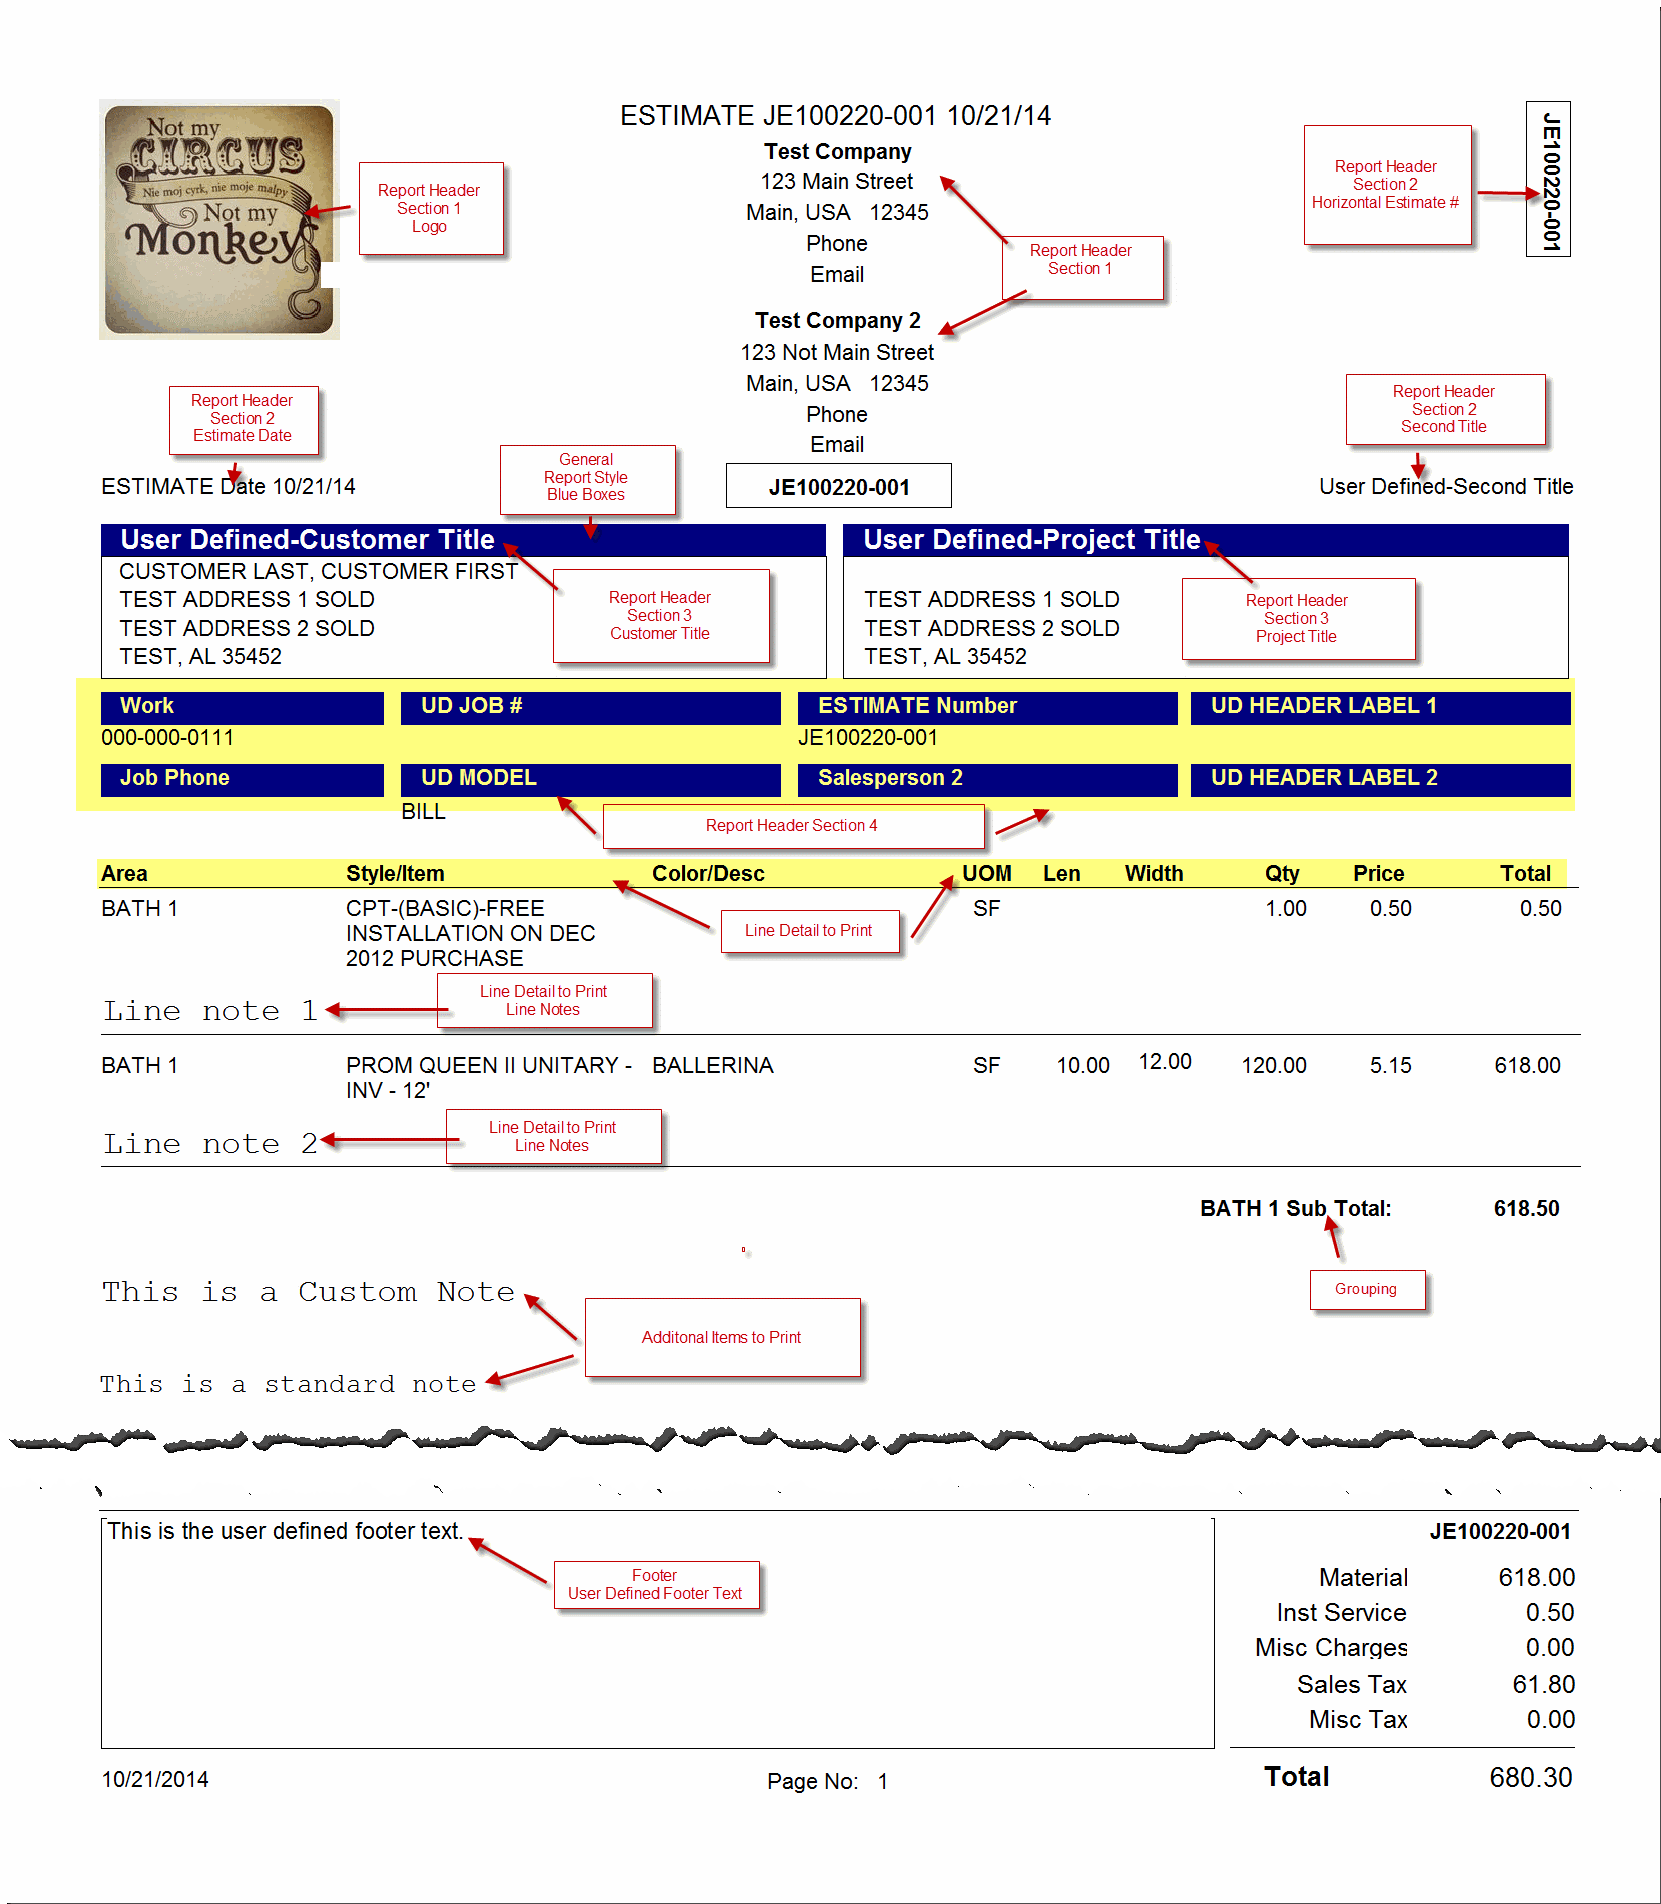
Report Style
This gives the choice of None, Blue Boxes, Black Boxes and Underline. This is the overall report.
Use Lines to Separate Estimate Lines
Checking this box will place a line between each estimate line.
Print for Overage
Checking this box will print all the line details, but only the overage charges.
With this box checked, some of the line detail options are no longer available.
Save Current Format Settings as the Default
This checkbox will save the current set up to be used when reopening the screen.
This is per user.
Report Header-Section 1
Letterhead
This gives you the choice to print on None, 1 inch, 1.25 inch, 1.5 inch or 2 inch.
When printing on letterhead the Logo, Title, Company Addresses and Vertical Estimate Number will not print.

This is in addition to the standard .5 inch margin. For example, the 2 inch gives from for 2 inches of preprinted letterhead starting at .5 inch from the top of the page
Vertical Estimate # on Right
Check this box if you want the Vertical Estimate # to print.
Logo
None, Left, Centered and Right

The image size must be 2"x1.75" to fit into the space provided to avoid any skewing of the image.
Title
None, Left, Centered and Right
Title Format
This can be set to print Estimate Number, Date or Both
Company Addresses
Addresses can be form The Company Information, Store Information, Store Ship To or User Defined for zero, one or two addresses. If using the User Defined fields, the address needs to be entered on the User Defined Fields section on the Print Screen.
Report Header-Section 2
Estimate Date
None, Left, Centered and Right
Second Title
None, Left, Centered and Right. The text for the title should be typed in.
Horizontal Estimate Number
None, Left, Centered and Right
Report Header-Section 3
Customer & Project Titles
Type in the titles to appear above the Customer and Project Addresses.
Report Header-Section 4
Field 1-8
Users can select up to 8 fields to print on the report. Fields 1 and 2 have less options than Fields 3 to 8 since they have a smaller width.
Line Detail to Print
Selecting an item includes the detail, deselecting would not include it on the printed estimate.
Select Lines to Print
When checked, this option allows you to tag only the lines that should print
Grouping
Sort Grouping
In order to use this option, make sure that “Subtotal by Area” is not selected. Click the drop down arrow next to this field to choose the Layout you wish to print for this estimate.
The layouts are defined in Define Print Groupings.
Subtotal by Area
Selecting this option prints the entire Estimate and subtotals the line detail by areas. The lines will be sorted by area unless you are using a sort grouping.

Estimate Totals to Print
Hide All Totals
Check this box to use print groups and have a base bid and a total bid on the same estimate. This setting will remain as selected until it is manually changed.
Total Details
Selecting this option will print detail information on the estimate.
Combine Labor/Material/Misc. Totals
Selecting this will print a single total rather than a sub total for labor, material and miscellaneous charges.
Product Code Totals
Selecting this option allows you to print a listing of all material used for a particular estimate by product code.
Footer
Text at the bottom of the report can be set to None, Standard Message, Custom Message or User Defined. If User Defined is selected, the desired Footer text should be entered in the User Defined Fields section on the Print Screen.
Additional Items to Print
These all print in the body of the Estimate. Attachments can use different graphic picture formats as well as non-graphic files such as .pdf, word, excel, text files and also Measure for RFMS files. Supported graphic formats include bmp, .wmf, .pcx, .gif, jpg and even .wav(sound) files.
Estimate Pictures
If there are estimates pictures that should be included, select this option.
Line Pictures
If there are line pictures that should be included, select this option.
Custom Note
If the custom notes should be included, select this option.
Standard Note
If the standard notes should be included, select this option.
Print Cover Page
If you wish to attach a cover page to this estimate, select this option.
You may use the RTF cover page maker located on the toolbar on the main estimate screen  , from which basic word processing tools are available.
You may also use Microsoft Word (or any program that has the capability of saving as a Rich Text file) and save your cover page as an RTF. Enter the cover page information. When finished, click the Save button located on the top of the toolbar. You will be prompted to save the cover page in a particular directory on your computer.
Click the F8 button to attach the appropriate cover page to this estimate. Once this is selected it is sticky, meaning it will be there the next time you print.
Click  to erase the chosen file.
Click  to edit the RTF cover page created from the main estimate screen.
Print Approval Signature
You may use the RTF cover page maker located on the toolbar on the main estimate screen , from which basic word processing tools are available.
You may also use Microsoft Word (or any program that has the capability of saving as a Rich Text file) and save your signature page as an RTF. Enter the signature page information. When finished, click the Save button located on the top of the toolbar. You will be prompted to save the signature page in a particular directory on your computer.
Click the F8 button to attach the appropriate signature to this estimate. Once this is selected it is sticky, meaning it will be there the next time you print.
Click to erase the chosen file.
Click to edit the RTF cover page created from the main estimate screen.
Printer Options
Preview
Click in this box to preview the estimate on the screen before sending to the printer.
Copies
Select the number of copies you wish to print.
Paper Size
Letter Portrait, A4 Portrait
Printer
Click the ellipsis button to select the printer you wish to use.
Email Options
Attachments
Select up to 4 attachments to email along with the Estimate Report.
Subject
Type the subject of the email in this field.
File Name
Type the name to give the estimate as a PDF file.
Configure Email
This button opens the Email Configuration (Outbound Mail Only) screen that can be found at Utilities>System Options>Email Configuration
Message
Type the body of the email in this field.
Email PDF
Click this button when the email is ready to be sent.
Comments
Article is closed for comments.