I. Introduction
This guide describes the setup and configuration process for Ops Connect (RFMS to Ops Technology integration). Ops Connect allows you to quickly send invoices directly to Ops Technology without rekeying information, saving you time and preventing errors.
II. Requirements / Prerequisites
- The server that hosts the RFMS executable files must have .NET 3.5 (or later) Most newer versions of Windows server should already have this file, but it may need to be installed manually on older servers.
- You must acquire an Ops SFTP username and password and the names of the SFTPImport and Export Directories from RealPage (Ops) support. Your Ops contact can provide this for you. They should enable your account for SFTP, not FTP. Click here for tips on completing your paper work.
- Email servicerequests@opstechnology.com or call at 1-844-778-3636 to verify your account is set up on SFTP.
- Each Ops customer may have one and only one corresponding customer in RFMS, and RFMS customers may have one and only one associated Ops customer. When entering the customer number on ops do not use a comma. IF you have multiple RFMS customers for a particular Ops customer, you will need to restructure your customer list to accommodate this requirement. There are several advanced features for managing company/property relationships in RFMS, and your trainer can help you determine how best to structure your customers to manage these relationships.
- Ops will reject any invoice where the line total does not match quantity * total. Line locking can cause these totals to differ. As part of setup, we will disable automatic line locking, and you should consider protecting the line lock button with a password to prevent users from accidentally locking the line total.
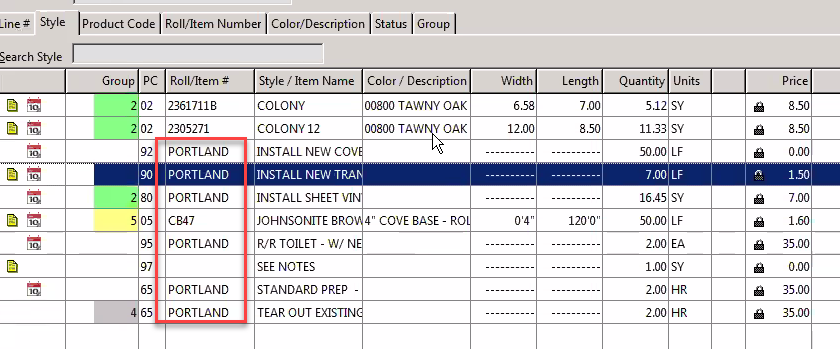
- Your service descriptions should be unique. The example below would be rejected as duplicate SKU with different prices.
- You will need to obtain the OpsImportExportTaskInstall.exe from the RFMS business office.
- You will need to obtain an Ops Connect license file from the RFMS business office.
III. Initial server setup
IMPORTANT: RFMS hardware support can advise customers regarding the installation, but this step should be performed by the user’s IT technician.
1. Run the Install File on the Server.
2. Install Ops Connect license
- Obtain your Ops Connect license from the RFMS business office.
- Install the license according to the directions from the business office.
3. Notify Ops/RealPage(Not affiliated with RFMS)
Once setup is complete, notify Ops/RealPage that you are about to begin sending invoices to the FTP server, so they can turn on the importer.
4. Create directories
- In the RFMS folder, create a directory named OpsTechExport.
- In the RFMS folder, create another directory, this time named OpsTechImport.
- In each Ops folder, create a subfolder named Archive.
5. Update Config File
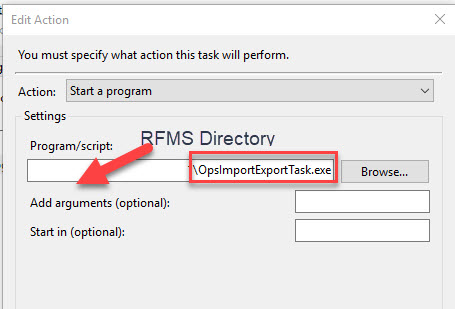
- Open OpsImportExportTask.exe.config, this file is created by running the installation routine.
- Set your SFTP v FTP value.
- Change your Username, Password, RfmsImportDir, RfmsExportDir values.

The Username and Password are for the FTP or SFTP site that was received from OPS Connect.
6. Create Scheduled Task
- Open Task Scheduler
- Create Task
- Create a New Trigger
- Create a New Action. Check the Start In.
- Click OK to finish editing the action, then click OK to save the task.
7. Test Scheduled Task
- In your OpsTechExport directory, create a file named txt.
- In Task Scheduler, click Task Scheduler Library and select opsImportExportTask.exe.
- Click Run (on sidebar).
- After a short delay, the test.txt file will be copied to the FTP server, and the local file will be moved into the Archive directory. Check to ensure that the file transfer was successful, then delete the test.txt file from the Ops FTP server.
User setup
IMPORTANT: Please be aware that each invoice may only be sent to Ops one time. If an invoice is sent in error, you must correct it by logging in to the Ops website and fixing the issue from there. You should only give Ops permissions to users who are authorized to send finalized invoices to customers.
Before a user can send any invoices to Ops, you must give that user permission to do so and set their export directory. This step should be repeated whenever new users need to be set up for Ops.
1. Set Ops export folder
- Open Order Entry and go to Utilities > System Options.
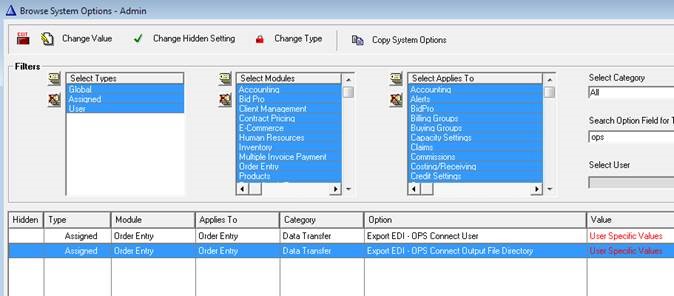
- Find the option labeled Export EDI – OPS Connect Output File Directory.
- Tag the users who will be using the Ops features and set the value to the user’s path to the OpsTechExport This should be the path as accessed from the user’s workstation.
2. Enable Ops features
- Open Order Entry and go to Utilities > System Options.
- Find the option labeled Export EDI – OPS Connect User.
- Tag the users who need permission to use the Ops features and set the value to Yes.
3. Turn off automatic line lock
- Open Order Entry and go to Utilities > System Options.
- Find the option labeled Lock Order Line.
- Change the type to Global.
- Change the value to No Automatic Line Lock.
V. Customer setup
IMPORTANT: It is best to begin by enabling a single customer for testing purposes. After some time has passed and everyone is comfortable with the new functionality, additional customers can be added.
To use the integration features, each Ops customer will need to be set up in both the Ops merchant site and in RFMS. This step will be repeated whenever additional customers begin using Ops to receive invoices.
1. Change Ops Account #
- In Order Entry > File > Customers, look up the RFMS Customer # for the customer in question. This number is the automatically generated customer number that cannot be changed.
- Log in to the Ops merchant gateway using your Ops username and password.
- Each Ops customer has an account number that can be changed. You will need to edit the customer in question and change this account number to match the RFMS customer number. Ops support can walk you through this step. NOTE: Use only numeric characters; do not include a comma for customer numbers greater than 999, and do not use spaces or letters.
2. Configure RFMS customer
- In Order Entry > File > Customers, open the RFMS customer for editing.
- On the second tab, change Export EDI to OPS CONNECT. This enables Ops invoices to be exported for the customer.
- On the second tab, select Require PO. The PO # field is sent to Ops as the WTN, so this will ensure that users enter the WTN information.
VI. Verify setup
To test that your customer is properly set up, simply follow these steps:
- From the workstation of an Ops user, find a customer order that is ready for invoicing and click the Print
- Select Invoice.
- On the print options screen, you should see an option for Create OPS Invoice. This will be selected by default.
- Once the print (it can be printed to file vs hard copy if desired) is complete, if you selected print preview, you will be asked to Create Ops Export Invoice. Select yes to export the invoice. (If you did not select print preview, the system will export the invoice automatically without asking.)
- Check the OpsTechExport directory for the invoice.
- Test by right clicking OpsImportExportTask.exe and run from server.
- Once the invoice is on the Ops FTP server, it will wait there until the Ops import job runs. Ops import jobs run on a recurring schedule; you should ask your Ops representative if you have questions about this schedule.
VII. Troubleshooting
1. Option to export invoice is not present
- Is the Ops Connect license present? Check Utilities > System Options > System Information Summary and make sure that OPS Connect is checked.
- Are you using ERRM accounting? If so, make sure that you are printing the Invoice. ERRM acknowledgements do not export to Ops, as they are not yet finalized.
2. Option to export invoice is disabled
- Is the user set up for Ops integration? See the Customer setup section and check the user’s configuration.
- Are you trying to export an invoice that has already been exported? Ops only allows a particular invoice to be exported one time. If you try to export an invoice twice, the option to export the invoice will be disabled the second time.
3. Error message while exporting invoice
- Is the user’s Ops export directory set correctly? See the Customer setup section and check the user’s configuration.
- Has the user become disconnected from their network drive? Check that the user can still access the configured export path.
4. Invoices do not transfer to Ops FTP
- Are the scheduled task parameters set correctly? See the Initial server setup section and make sure that the scheduled task is configured correctly.
5. Invoices are sent to Ops FTP, but they do not import into to Ops
- Are the invoices still in the Ops FTP folder? Consult with Ops support. Ops support may need to change your import schedule.
6. Invoices are rejected from Ops
- Did Ops report a duplicate invoice? It is likely that someone created the invoice manually in Ops before the invoice import was complete.
- Did you forget to disable automatic line locking, or did someone lock the line on this order? Ops will reject any invoice where the line total does not match quantity * total. Line locking can cause these totals to be mismatched, so this feature should not be used with Ops invoices.
- If the source of the problem is not apparent, check with Ops support to determine the cause of the problem. You may need to modify your customer setup or change other information. You may need to provide RFMS support with the Ops information, so we can further diagnose the issue.
Comments
Article is closed for comments.