
Property Connect Overview
Since this documented procedure involves modifying part of the Server Operating System, RFMS recommends that you have YOUR LOCAL IT Professional perform this. YOUR LOCAL IT Professional should be consulted on installation of IIS, Firewall Rules, Anti-Virus, and SSL certificates to mitigate the risk associated with web sites. In order to perform this installation, it is likely that the Server Operating System CD may be needed, and in addition to this, Windows Updates/Windows Service Packs may need to be downloaded and installed. Again RFMS recommends that you have YOUR LOCAL IT Professional perform this installation.
Property Connect is a tool used to place orders via the internet.
Functions Include:
- Drafting an order
- Submitting an order
- Tracking order progress
- Viewing invoice balances.
- Flexible Permissions for accomplishing these tasks

Orders are submitted via web browser, your customers are not required to have bidpro to submit orders.
The BidPro project name has to exactly match the Customer Ship_Name.for the property to show
Documentation for Property Managers
Click the link below to email or print a document for property managers. This has been saved in a word format so that it can be customized with a logo and information relevant to your setup. For example if not showing preferred time, delete that from the Property Manager User Guide.
https://rfmsinc.zendesk.com/hc/en-us/articles/201893057
Updating
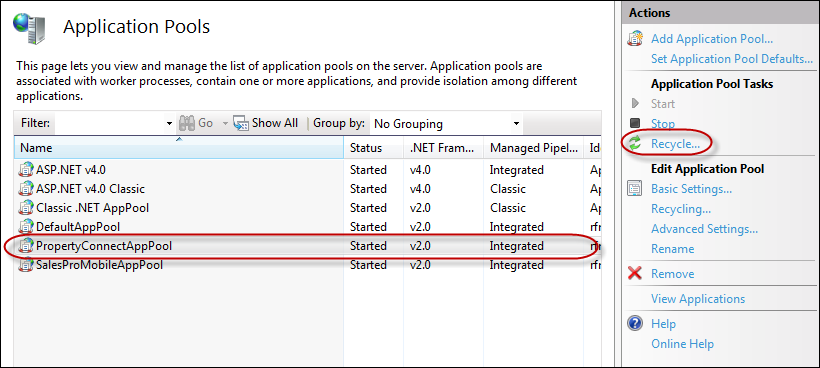
After the Property Connect software is updated, the application pool should be refreshed so that the changes from the update will over write the cached version.
Control Panel>Administrative Tools>IIS(Internet Information Services) Manager>View Application Pools>Highlight the appropriate name>Click the Recycle Button.
Resetting Admin Password
The Default Admin Password is admin admin
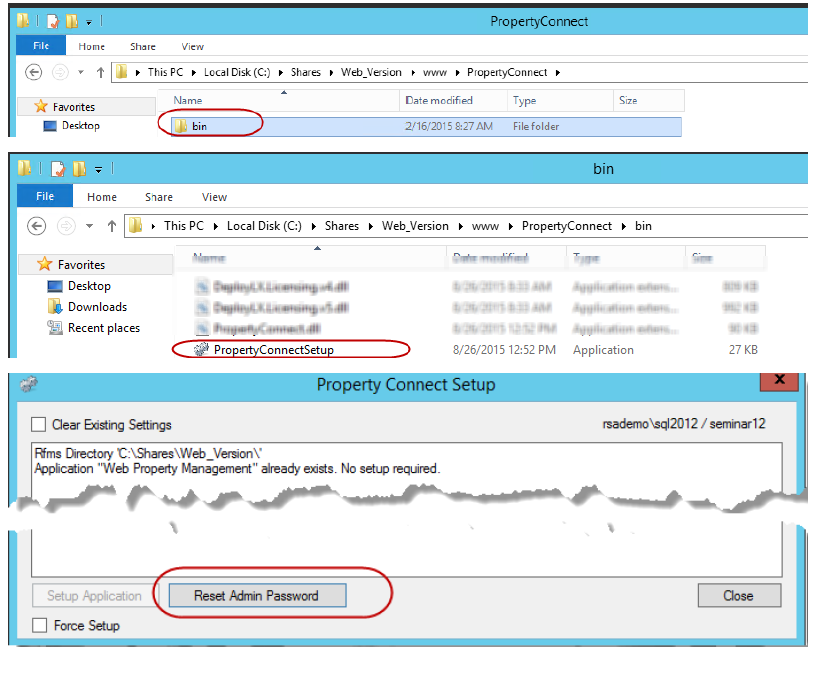
- To reset your admin password, go to www>Property Connect>bin in the RFMS Directory
- Open the Bin folder.
- Click on PropertyConnectSetup application.
- Click Reset Admin Password.
Set Up
Prerequisites
- Set up contract products using Contract Pricing (Optional)
- Set up Properties and Models using Bid Pro.
- Set up User Names and Passwords for Properties via the Administration Module.
Administration
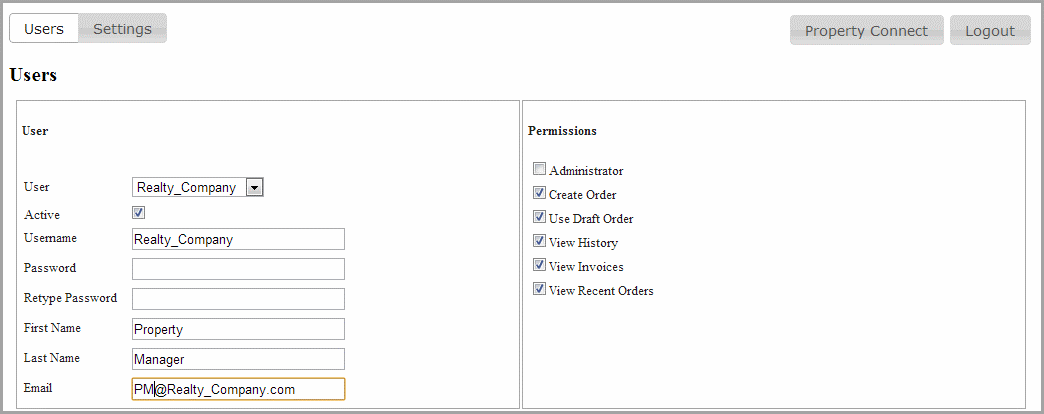
User Names and Passwords will be assigned to access Property Connect based on which users should have access to the various areas of Property Connect.
It is recommended to first set up a user from with rights to all areas of Property Connect.
In the User field, use the drop down arrow to select - -New User- -.
Check the active box.
Enter a Username in the next field.
Enter the password once to set it and a second time to confirm it.
The password only contain: Letters, Numbers and _ (underscore). No other characters or spaces are allowed. The password must be at least 6 characters long.
Enter the user’s actual information in the First Name and Last Name fields.
Enter the user’s email address.
Required Information
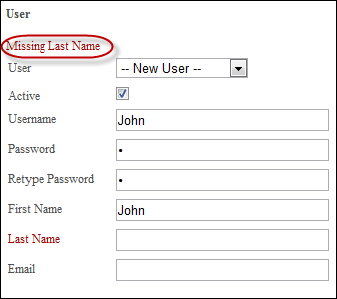
If all the required information is not entered, the missing field name will be highlighted in red, and a hint will be displayed.
Permissions
Next select the permissions for the user.
- Administrator
- Create Order
- Use Draft Order
- View History
- View Invoices
- View Recent Orders
Choose the properties
Using the arrows, assign or un-assign properties to the user.
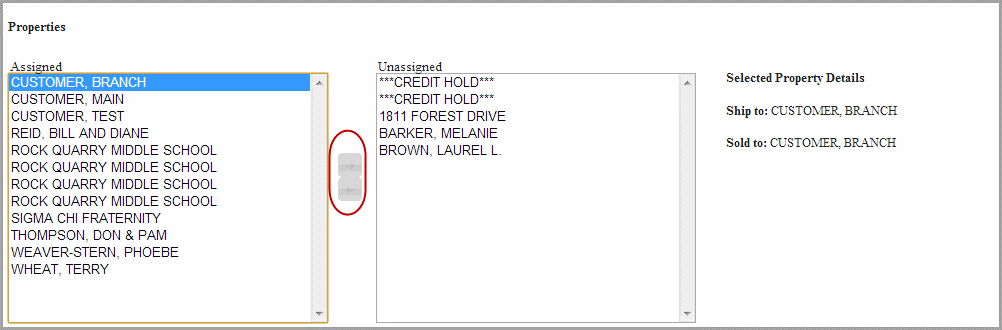
Update: Saves the new user or changes to the user.
Delete: Deletes the currently listed user.
Reset: Discards the changes for the currently listed user.
Settings
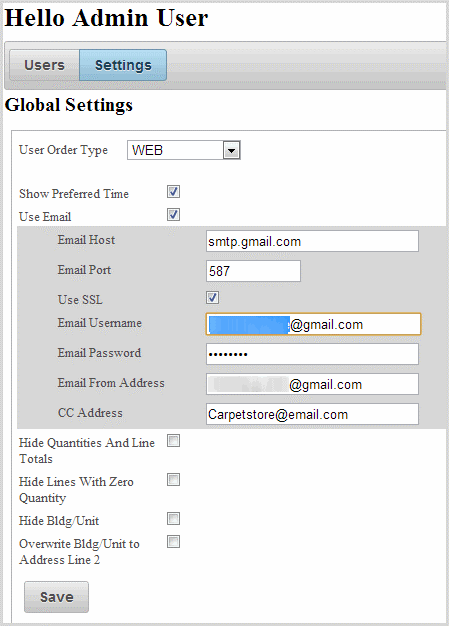
User Order Type
The pick list for this is set in RFMS>Order Entry>Utilities>Set Up>Order Type. It will be displayed on the additional information tab of the customer order.
Show Preferred Time
Check this box to show the preferred time field, leave it blank to not give customers the option.
When using this option, the date must be the next day or later. The time range is determined by the available time defined in Schedule Pro.
Use Email
Property connect has the ability to send a confirmation email to the Property Contact and also to you when an order has been submitted. To use this feature check the Use Email box.
Email Settings
Email Host/Port
This will be the host that allows emails to be sent from the property connect web interface.
This does not require that outlook be installed on the workstation, but an email server or service that is used for email that conforms to normal SMTP mail standards is required (i.e. AOL may not work.) An internet connection is also required before attempting to send email. For assistance with this, please contact a local technician, as RFMS will not know the name of your SMPT Server.
Use SSL
The Use Secure Connection (TLS) box may be required for using some email services such as yahoo and Gmail.
Email from Address
This is what will be displayed in the from information in emails received by the Property Contact.
"Email username" and "Email from address" must match.
CC Address
Emails from Property Connect will be sent to this email address in addition to the Property Contact. One use for this would be the person checking the incoming web orders as a reminder.
Hide Quantities and Line Totals
To show line totals on orders, uncheck the Hide Line Totals box.
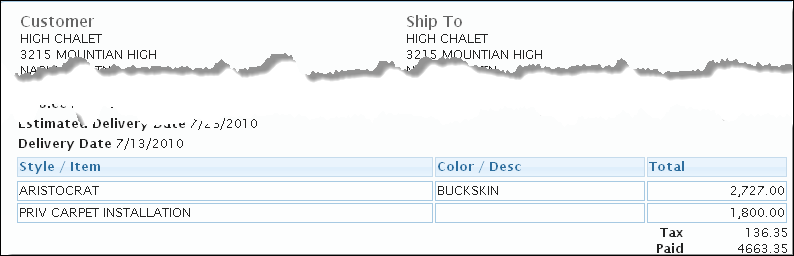
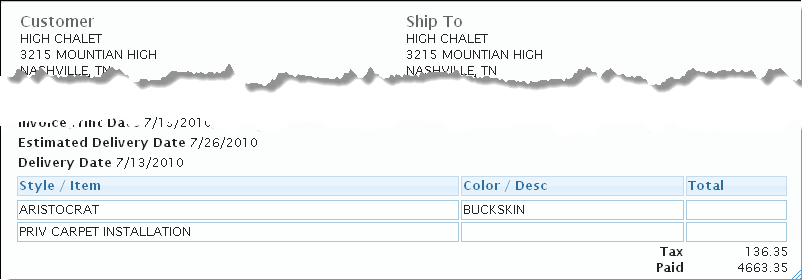
Hide Lines with zero quantity
Informational lines and lines that do not contribute to the invoice total could be entered on the estimate. To not display these lines to the Property Contact for draft or order creating purposes, check this box.
Hide Bldg/Unit
If this field is not hidden it will be required in creating a draft or order. If this is not included, delete it from the Property Manager User Guide.
Overwrite Bldg/Unit to Address Line 2
There is a field on the additional tab of customer orders for this information. To send it instead to address line two of the Ship to Information on the customer order, check this box. This option is not available if Hide Bldg/Unit is selected.
Posting Draft Selections
RFMS Navigator-BidPro
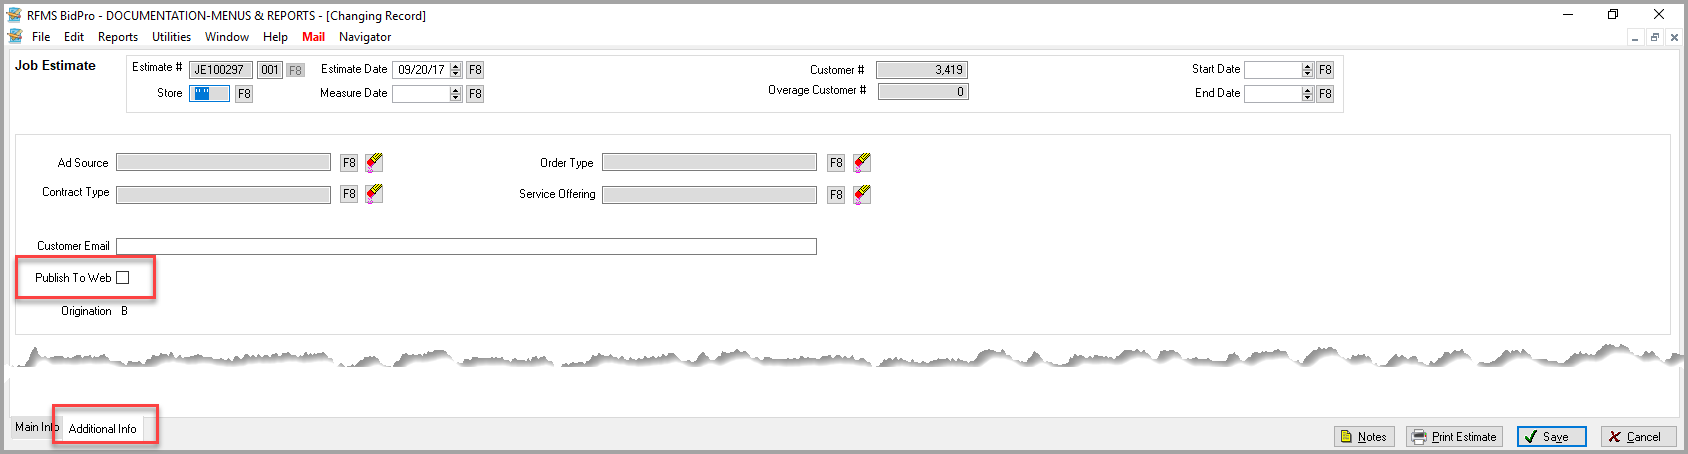
Customer’s draft options are initially created as a BidPro estimate or sub-estimate, optionally using contract pricing. A draft is made available for web ordering by checking the Publish to Web checkbox (on the Additional Info tab). This box is not available if the customer has not been pulled from the customer file.
Processing Submitted Orders
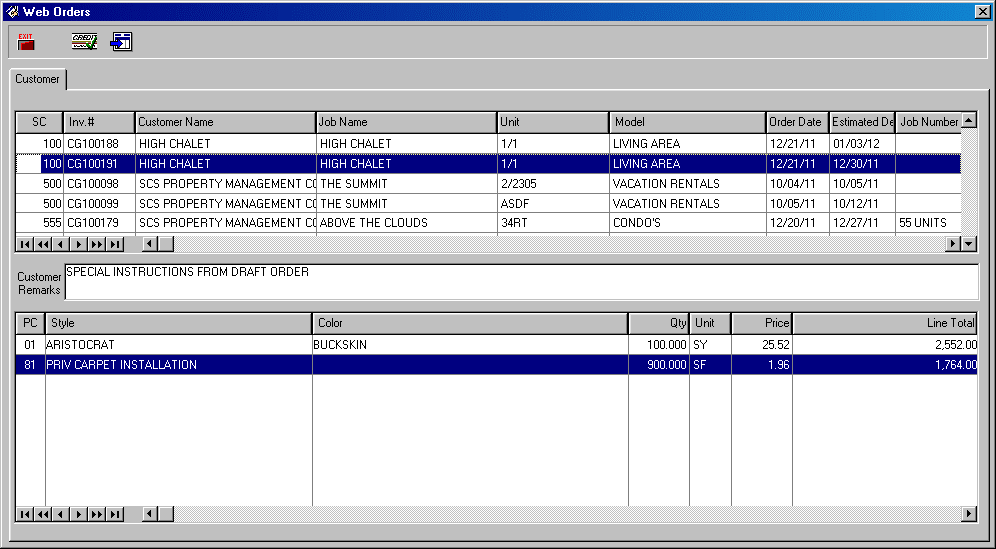
Order Entry>Customer Orders>Web Orders 
A special area is available to list orders submitted from the Property Connect system. This will pull over the next Web Order.
The words Web Order will be in red if there are orders to be processed.
The stores available for view from here is determined by the setting in Order Stores Visible to User.
Orders generated Property Connect are sent to the web order screen for priority processing and credit checks. These orders are not included in credit check from customer orders.
Export to Order Entry 
Highlight the order to process and then click the export button to send it to customer orders for processing. The order number and date from Property Connect will be retained.
Order Tracking 
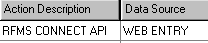
Orders originated from Property Connect will look like the example:
To customize the logo and site name:
- Prepare a small version of your logo. Many free online tools can help do this, such as Rsizr (http://rsizr.com/). We recommend creating a JPG or PNG image that is close to 80x80 pixels in size.
- Copy the logo file to (Your RFMS Directory)>www>PropertyConnect.
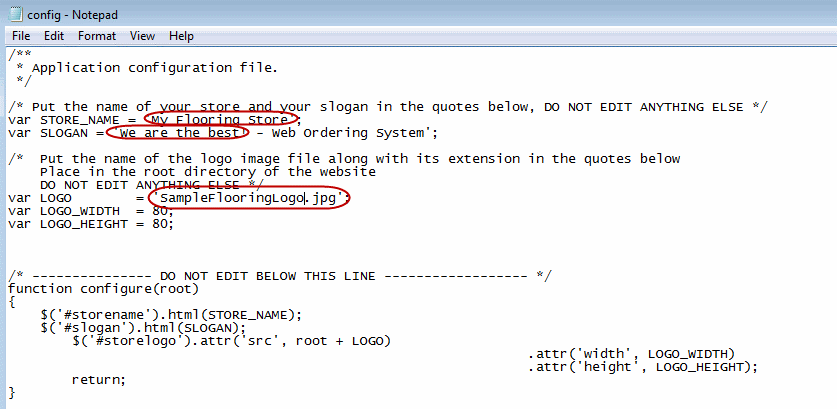
- Open the “config.js” file in the root folder of your website in a text editor program such as Notepad. You may change the store name here, and you should update the logo name to match your new logo. Only the logo name must be change along with its extension. (Eg: 'logo_name' is invalid, 'logo_name.jpg' is valid.
Themes
Select a preset theme
- Go to http://jqueryui.com/themeroller/ and select “Gallery” on the left. Then select a theme from the list.
- When you are satisfied with your theme, select “Download theme.”
Build a custom theme
- Go to http://jqueryui.com/themeroller/ and select “Gallery” on the left. Then select Redmond. This is the current base theme for the site.
- Switch back to “Roll Your Own” on the left.
- Select your preferred colors in each sub-category. Press enter while in a field to update the graphics on the right. You should do this again just before downloading the theme.
- When you are satisfied with your theme, select “Download theme.”
- On the theme download page, be sure that the dropdown on the right says “Custom Theme.” If this is not correct, you will need to go back to the previous page and make sure your customizations are shown on the right.
Install the theme
- On the theme download page, make sure all of the components are checked.
- Select the 1.9.x version of jQuery on the right.
- Click “Download.”
- Back up your Property Connect folder on the server. (The default location is C:\inetpub\wwwroot\PropertyConnect)
- Open the downloaded zip file and extract it.
- In the extracted folder, find the jquery-ui-1.8. <version>.custom.css under the css\custom-theme directory and rename it to jquery-ui.custom.css.
- In the extracted folder, find the jquery-ui-1.8. <version>.custom.min.js under the js directory and rename it to jquery-ui.custom.min.js.
- Copy the jquery-ui.custom.css file and the images folder from inside the extracted css\custom-theme folder to your PropertyConnect\Scripts folder. This will replace existing files.
- Copy the jquery-ui.custom.min.js file inside the extracted js folder to your PropertyConnect\Scripts folder. This will replace an existing file.
For information on Kits, click here.
Comments
Article is closed for comments.