Generating and Printing Inventory Tags
Correcting Mistakes While Scanning
Preparing Roll and Item Inventory
The Barcoded Inventory module is used to take a physical inventory with a handheld terminal, and then transfer that inventory information to the RFMS inventory system for reconciliation. Barcoded Inventory is convenient and reduces the time required for the taking of physical inventories.
RFMS Barcoded Items will not be able to be scanned in Order Entry.
Getting Started
The Barcoded Inventory module is used to take a physical inventory with a hand held terminal, and then transfer that inventory information to the RFMS inventory system for reconciliation. Bar-coded Inventory is convenient and reduces the time required for the taking of physical inventories.
Supplies Needed:
Tri-Coder - Worthington Data Tri-Coder, Model LT 5001H 
It is recommended that each inventory has new top of the line batteries installed. This will protect the “internal” battery. Many folks like to take the batteries out so that they do not have a chance to corrode. This causes the negative effect of the “internal” battery to run down and die. If the internal battery dies, the programming may be lost and returning the unit to RFMS and paying a programming fee will be required.
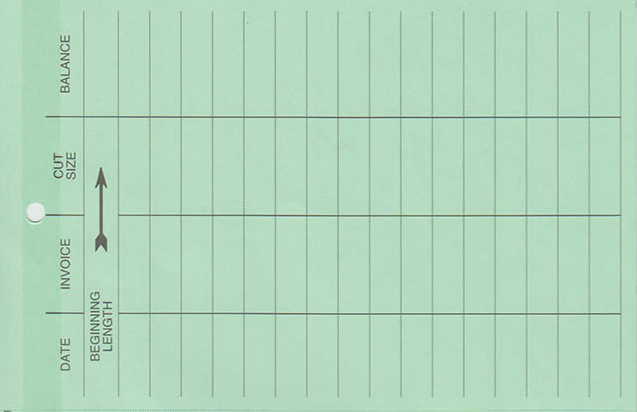
White (or light colored) Roll Tags 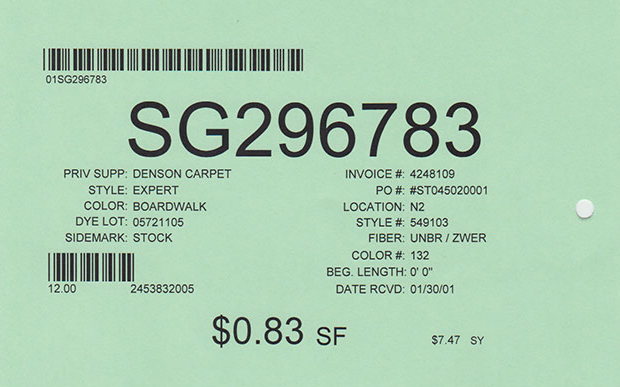
Click here for ordering information.
Item Tags for Items not pre-barcoded
Basic workflow for Bar-coded Inventory:
1. Purchase the Tri-Coder and Tags.
2. Generate Bar Codes for Item Inventory
3. Print the Inventory tags from Roll Inventory or Item Inventory.
4. Place the tags on the inventory.
5. Scan the tags as part of physical inventory process.
6. Connect the Tri-Coder to computer.
7. Transfer (upload) the scanned information into RFMS Bar-coded Inventory.
8. Resolve any discrepancies.
9. Reconcile the modified physical information to the RFMS Roll or Item Inventory.
NOTE: It is important to complete one step before beginning the next!
Generating and Printing Inventory Tags
Before You Start:
If roll or item tags are not already printed with barcodes, they should be reprinted before scanning can begin. If inventory tags have not been used in the past, a tag should be generated and printed for current inventory.
Tagging Records
1. Click Inventory>File> (Roll Inventory or Item Inventory).
2. To tag the entire inventory, click on the Tag All button  .
.
NOTE:
• To print tags for just a specific group of inventory, click on the Find button  .
.
• Complete the Custom Filter Parameters screen and click OK to return back to the Inventory browse screen. Because a filter has been applied, only the records that meet the criteria of the filter will be shown. From this point, click on the Tag All button to tag all of the records in the filtered group.
• The number of tags can be specified for items. Rolls default to one.
Printing Tags for Rolls
Once the roll inventory records are tagged, you may print.
Inventory>File>Roll Inventory
1. From the Roll Inventory screen, click on the Print button  .
.
2. Select the appropriate options for printing. The roll tag type options will vary because custom tag configurations may be installed. The normal default tag type is designated as Standard.
3. Click the Print Roll Tags button.
4. When printing is done, click on either Yes or No to print again.
NOTE: If No is chosen all tags are cleared, to print again, go through the tagging process.
Printing Tags for Items
Once the item inventory records are tagged, you may print.
Inventory>File>Item Inventory
1. From the Item Inventory screen, click on the Print button  .
.
2. Select the appropriate options for printing. The Item tag type options will vary because custom tag configurations may be installed. The normal default tag type is designated as Standard. If you wish to reconcile item inventory, be sure to click in the System Ref # box. The System Ref Number is used during the scanning and reconciliation process. If System Ref Number is not used, you can still scan your item inventory, upload the data, and then review it. You will not be able to perform the last step, which is to reconcile. If Item numbers are more than 20 characters long, the system reference number must be used to be readable with a scanner.
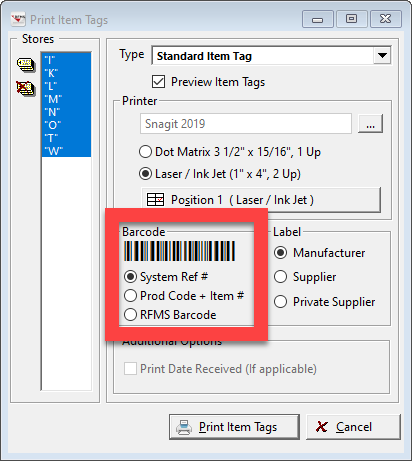
3. Click on the Print Item Tags button.
4. When printing is done, click on either Yes or No to print again.
NOTE:
If No is chosen, all tags are cleared, to print again, go through the tagging process.
To RECONCILE item inventory through Barcoded Inventory, two things must be done:
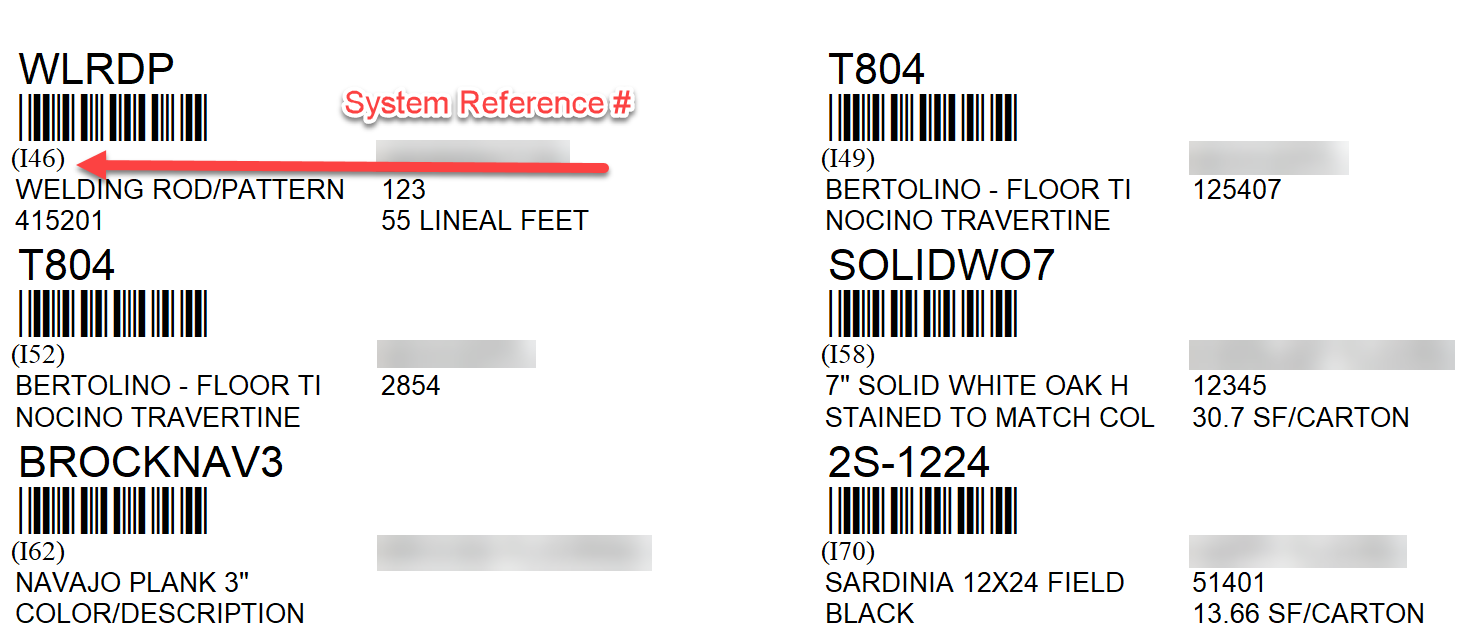
If you consolidate item inventory when receiving items, you must print an item tag for each item you wish to reconcile because you will have multiple inventory records for the same item. Print the System Ref # on the tag by selecting that option on the Print Item Tags option box. RFMS Bar-coded Inventory uses the System Ref # to match up Item Inventory records. When scanning, be sure to scan the System Ref # printed on the item tag. If the number is not scanned, that item inventory cannot be reconciled.
Item Tag Printed by System Ref #
Print this way to reconcile item inventory.
Scanning Inventory
Scanning Roll Inventory
To begin scanning the roll inventory, start by turning on the Tri-Coder. The Tri-Coder will begin the process by asking specific questions:
Data Collection?
Answer yes by pressing the <Enter> key.
Program #?
Enter 1 for Roll Inventory.
Location?
Type in the location code for the bin to be scanned or counted (up to 12 characters). If location code is not used, press <Enter> for none. This option is only for Rolls. Even if not reconciling by location, it is good to enter the location to make finding exceptions easier.
Roll Number?
Scan the bar coded roll number. The scanner will emit a red stream of light that should be pointed across the printed bar code on the tag. This process can be awkward at first, but with a little practice scanning will be quick and easy. Some difficulties may occur with scanning if transparent tape is covering the bar code, the bar code is too light or printed too close to the edge of the tag, or if the tag is severely damaged. If the roll cannot be scanned, manually enter the roll number, pressing <Enter> after entry is complete. To enter alphabetical characters, press the <Shift> key on the Tri-Coder, which allows the number keys to be used as letters of the alphabet.
If the roll number must be manually entered, be sure to enter the product code. 01=Carpet and 02=Vinyl before entering the actual roll number.
Enter Length (Feet)?
Type in the current length (in feet, not yards) available on the roll and press <Enter>. This entry must be at least 2 digits. For example, a roll with a 6 foot length must be entered into the Tri-coder as 06. Do not enter inches here.
Enter Inches?
Type in the inches available on the roll and press <Enter>, converting decimals to inches. For example, a roll tag indicates 106.5 left on the roll. Enter this measurement as 106 FEET and 6 INCHES.
Width?
Type the width of the roll and press <Enter> or scan the width barcode if printed on the tag.
Continue this process until all rolls in the bin have been scanned. To enter a location code for another bin, press <END> when the prompt "Scan Roll #" appears.
When scanning is complete, press <F1> to end the Tri-Coder program. The Tri-Coder may be turned off for later uploading, or be connected to the computer for immediate processing.Scanning Item Inventory
To begin scanning the item inventory, start by turning on the Tri-Coder. The Tri-Coder will begin the process by asking specific questions:
Data Collection?
Answer yes by pressing the <Enter> key.
Program #?
Enter 2 for Item Inventory.
Item Number?
Scan the barcoded item number. The scanner will emit a red stream of light that should be pointed across the printed bar code on the tag. This process can be awkward at first, but with a little practice scanning will be quick and easy. Some difficulties may occur with scanning if transparent tape is covering the bar code, the bar code is too light, printed too close to the edge of the tag, or if the tag is severely damaged.
- Manual Entry of Item - Using System Ref
At the Item Number prompt (on the Tri-Coder) enter the letter I followed by the System Ref #, pressing <Enter> after entry is complete. To enter alphabetical characters, press the <Shift> key on the Tri-Coder, which allows the number keys to be used as letters of the alphabet. Example: I245 - Manual Entry of Item – Using Product Code & Item Number
At the Item Number prompt (on the Tri-Coder), enter the Product Code number followed by the Item Number, pressing <Enter> after entry is complete. To enter alphabetical characters, press the <Shift> key on the Tri-Coder, which allows the number keys to be used as letters of the alphabet. Example: 096576 Product Code = 09 Item # = 6576
Enter Quantity?
Enter the number of items available and press <Enter>.
Continue this process until all items have been scanned.
When scanning is complete, press <F1> to end the Tri-Coder program. The Tri-Coder may be turned off for later uploading, or be connected to the computer for immediate processing.
Correcting Mistakes While Scanning
If at any point during the scanning process, a mistake is made, the following instructions will explain how to make needed corrections.
After the mistake is noticed, press the <Up Arrow>on the scanner to switch to an "edit" mode. Press the <Left Arrow> key to scroll back through previous entries until the mistake is displayed. Pressing the <Up Arrow> key again will back up to the previously scanned roll.

Make the correction by pressing the <Delete> key to clear the existing data in the entry field. Do not use the <CLEAR> key. Enter or re-scan the corrected data. If manual entry is required, press the <Enter> key to continue. If the entry is rescanned, the Tri-Coder will insert the <Enter> automatically.

Press the <F1> key to continue on from the point where the <Up Arrow> was pressed.

Uploading the Data
Uploading (transferring) scanned inventory data to be reconciled with the RFMS Inventory module is done using the Barcoded Inventory program.
Inventory>File>Barcoded Inventory
1. Depending on the type of physical inventory scanned, click on either Barcoded Rolls or Barcoded Items.
2. For some users, the physical inventory and the computer are at different locations. Others have multiple tri-coders. To get your data from the tri-coder to the system:
- Connect the Tri-Coder to the PC like usual.
- Minimize RFMS and launch Notepad.
- Answer the following questions:
- DATA COLLECTION? ENTER “N”
- DO YOU WANT TO CONTINUE? ENTER “Y”
- DATA UPLOAD? ENTER “Y”
- DO YOU WANT TO CONTINUE? ENTER “Y”
- DATA UPLOAD? ENTER “Y
- Save at least 2 copies of text file, as one will be removed when uploaded.
- Go to Inventory>File>Barcoded Inventory
- Select Barcoded Rolls or Barcoded Items and continue to the next step. If selecting, the RFMS Barcoded Items, click here.
- Click on the Upload button
 .
. - The File Upload screen appears.
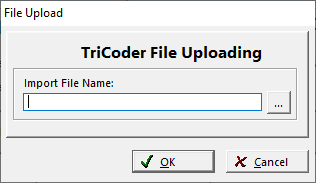
- Locate the saved text file by clicking the ellopse button for Import File name. Find the text file.
- Press Open, then Press OK on the File Upload screen. After the import, it will display a message box indicating how many records were successfully imported.
NOTE: Once the File is uploaded, the system deletes the notepad text file. The file has been saved to RFMS|UpldBak.
Data File Exists
You may hear a voice message from the Tri-Coder if you have existing data from a previous scanning session. You should delete the existing data if:
- You have uploaded and reconciled the data to RFMS Inventory and want to start a new scanning session
- You started scanning but want to start over
- You want to reconcile roll inventory by store location and are now scanning at a different store
Deleting the Existing File
When you are positive that you want to delete the existing data file in the Tri-Coder:
Turn on the Tri-Coder and answer the following questions:
Data Collection?
Enter "N".
Do You Want To Continue?
Enter "Y".
Data Upload?
Enter "Y".
The Tri-coder act like it is transferring data. However, since it is not connected to a computer, the data goes nowhere.
End of Transmit - Del File (Y/N?)
Enter "Y" to delete the file.
Roll or Item Main Data Screen
This screen is where all roll inventory processing takes place. After uploading data from the Tri-Coder, steps taken to reconcile can be followed in order as they appear on the toolbar.
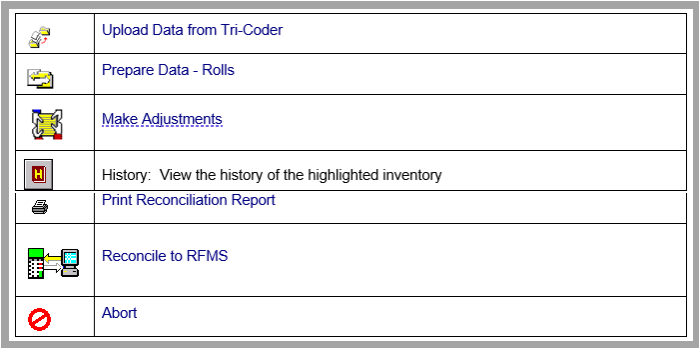
Other Options on this Screen:
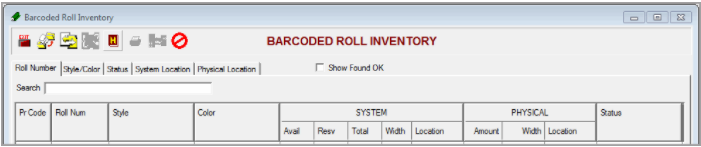
Sorting and Searching for Records on Screen
Click on the tabs to change the sort order of the list, enter information in the search field to locate a specific record.
Show Found OK
Click in this box to display scanned records that matched what is in RFMS Inventory. Most of the time you would deselect this box because you would be working on only those records that have discrepancies.
NOTE: It is important to complete one step before beginning the next!
Preparing Roll and Item Inventory
Preparing Roll Inventory
Inventory>File>Barcoded Inventory> Barcoded Rolls> Prepare Roll Inventory button. 
This process allows the computer to sort through the Roll inventory file, searching for discrepancies between the physical count and the RFMS system count. Do this procedure only after all data has been loaded from the Tri-coder.
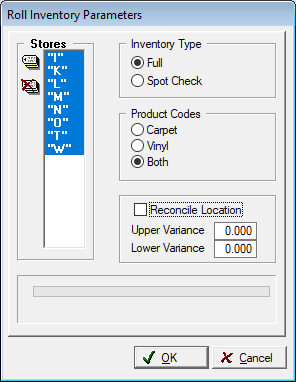
Options:
Single Store or All Stores
Roll Inventory may be reconciled for a single store, a combination of stores or all stores at once. Click on Single for an individual store code or click All for all stores.
Reconcile Location
Click in this box if warehouse locations are used during the scanning process and the reconciliation of locations is desired.
Upper Variance
The upper variance (in feet) is the largest shortage between the physical count and the RFMS amount available that the system will accept without including the roll on the exception report.
For example, during the reconciliation, 6 inches is entered as the Upper Variance and a zero lower variance. The physical count shows a roll's length as 12'8". The RFMS system shows a length available of 12'11". This roll would not be considered an exception. For the same inventory record and variance, a physical count of 12’2” with record a size exception because the physical count of 12’2” plus the upper variance of 6” is less than the system amount of 12’11”. In other words, even with the acceptable variance, there is still a shortage between the physical count and the amount in inventory.
Lower Variance
The lower variance (in feet) is the largest overage between the physical count and the RFMS amount available that the system will accept without including the roll on the exception report.
For example, during the reconciliation, 6 inches is entered as the lower variance and a zero upper variance. The physical count shows a roll's length as 12'8". The RFMS system shows a length available of 12'11". This roll would not be considered an exception. For the same inventory record and variance, a physical count of 13” with record a size exception because the physical count of 13’1” minus the lower variance of 6” is greater than the system amount of 12’11”. In other words, even with the acceptable variance, there is still an overage between the physical count and the amount in inventory.
In reality variances are used together, so for our examples, there would be a range of 6” below the available and 6” above the available. In other words any amount between 12’5” to 13’5” would be within variance.
Product Code
The option include reconciling either Rolls only (01) or Vinyl only (02) or both. Click on one of these to select.
Inventory Type
Click on either Full or Spot Check. This selection will allow the reconciliation of either the entire roll inventory file (Full) or a specific location (Spot Check). If Spot Check is selected, the reconciliation will ignore any "Not Found" records. A not found roll is a roll that is in the RFMS inventory file but has not been scanned. For example, if location W-1 was the only inventory counted and scanned, the remaining roll inventory in the RFMS file would not be considered "Not Found."
The inventory reconciliation takes place only after all inventory has been scanned and uploaded. The reconciliation process compares the scanned information to what is currently in the RFMS inventory system. A reconciliation report containing a list of any discrepancies that may be used to research and correct inventory problems.
Preparing Item Inventory
Inventory>File>Barcoded Inventory> Barcoded Items> Prepare Item Inventory button.
The inventory reconciliation takes place only after all inventory has been scanned and uploaded. The reconciliation process compares the scanned information to what is currently in the RFMS inventory system. A reconciliation report containing a list of any discrepancies that may be used to research and correct inventory problems.

Options:
Product Code
To reconcile all item inventory product codes, click on the Tag All button.
Or, you can click on individual product codes to select one or more for reconciliation.
Inventory Type
Click on either Full or Spot Check. This selection will allow the reconciliation of either the entire roll inventory file (Full) or a specific location (Spot Check). If Spot Check is selected, the reconciliation will ignore any "Not Found" records. A not found roll is a roll that is in the RFMS inventory file but has not been scanned. For example, if location W-1 was the only inventory counted and scanned, the remaining roll inventory in the RFMS file would not be considered "Not Found."
Store Location
Item Inventory can be reconciled for a single store code at a time. The default store code appears in this box. Click on the <F8> button to select an alternate store code.
Upload Status Definitions
The second step in reconciling the inventory is to print the exceptions report, asking for ALL statuses. Statuses are explained below.
Size Error - Rolls
A size error results when the scanned roll length, width, or warehouse location (if the location is to be reconciled) does not agree with the corresponding data in RFMS Roll Inventory.
Examples include mill shortages, cutting errors, misplaced, etc.
Quantity Error - Items
A quantity error results when the scanned quantity does not agree with the quantity in RFMS Item Inventory.
Examples include mill shortages, breakage, misplaced, etc.
Extra
A roll or item is considered an extra if present in the scanned data but not in the RFMS inventory. Extra rolls or items are not added through Barcoded Inventory. They should be entered in the normal manner through the RFMS Inventory Receiving/Costing process.
Examples include inventory not received into RFMS, inventory record deleted.
Not Costed
A roll or item has only been received by the bill of lading. If the physical and system amounts don’t match, these records will need to be manually adjusted on the inventory record as the automatic adjustment is not available for not costed inventory.
NOTE: If no assignments have been made to the inventory, and a receiving error caused the discrepancy, simply adjust the amount received. For other instances either:
• Unassign the inventory and then make the adjustment.
• Wait until the inventory is costed and make the adjustment.
Not Found
A roll or item is considered not found if present in the RFMS inventory but not in the scanned data.
Examples include missing inventory tag, scrapped goods, physically returned but not returned in RFMS, etc.
Not Prepared
All rolls or item will display "Not Prepared" if the Prepare function has not been performed. This process must be performed before the editing of scanned rolls can be done.
No Action
This status indicates that no action will be performed during the reconciliation process. This status will appear for "Extra Rolls". This status will NOT create an inventory adjustment.
Found O.K.
This status indicates that the scanned information matched the system information and no further action is needed.
Adjusting Inventory
After researching all Exceptions, Extras and Not Found records, the scanned data should be adjusted to reflect the correct information. Adjustments made through this screen are to the scanned data only (until you perform the Reconciliation procedure.)
NOTE: Adjustments can be made only after the Prepare function has been completed.
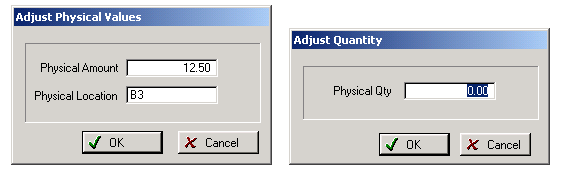
Making Adjustments
1. From the Barcoded Inventory Roll or Item screen, single click on the record to be adjusted.
2. Click the Adjustments button. 
3. One of the following screens will appear:
If the changes made to the scanned data create a match to the System data, the record will change to Reconciled.
To be Reconciled/Reconciled
Displayed in the upper right-hand corner of the screen.
To Be Reconciled
This indicates that the scanned physical data does not match the RFMS system data. This status will create an inventory adjustment when the actual reconciliation process is performed.
Reconciled
This indicates that the physical data matches the RFMS system data. Either the physical was a match when scanned or the record was edited. This status will not create an inventory adjustment.
Reconciliation Report
This report prints a listing of prepared data. Use this report for research prior to making adjustments or reconciliation.
From the Barcoded Inventory Roll or Item screen:
1. Click the Printer Button.
2. Select the status designations to print on the report, or you can leave all options blank to print everything. If you are performing the Reconciliation process, these options are unavailable.
Exceptions = Size or Quantity Errors
3. Click the OK button to begin printing.
Reconciling Inventory
Inventory>File>Barcoded Inventory> (Barcoded Rolls or Barcoded Items)>Reconcile Button 
After all, adjustments have been made, the RFMS Inventory files should be reconciled to the adjusted entries.
1. Click on the Reconciliation button. 
2. An alert box appears allowing you to confirm the reconciliation. Enter a date to be used as the adjustment date.
3. Click the OK button to begin the reconciliation.
NOTE:
• Adjustments made to the amount available in the RFMS inventory records will create an inventory adjustment that should be posted when the journal is closed. The adjustments will be dated with the "Adjustment Date" entered when reconciling.
• After the reconciliation has been performed, the data file that contains the uploaded inventory information will be deleted by the system.
• ERRM Users: the inventory adjustments created during the reconciliation process are automatically posted to General Ledger.
• Non-ERRM Users: the inventory adjustments created during the reconciliation process are not automatically posted to General Ledger. They are handled in the normal month-end processing where the posting of any inventory adjustment is optional in the Journal Close routine.
• All adjusted inventory is printed on a report after the reconciliation process has finished.
Keep the adjustments report printout with any written instructions to count personnel for a period of time as instructed by a CPA.

This option allows aborting the current session, deleting the data that was previously loaded from the Tri-Coder.
Comments
Article is closed for comments.