Order Entry>File>Batch Processing or F12

Invoicing was added in version 22.1.
Orders are listed on the Batch Processing screen when picking tickets, work orders or invoices are selected and lines are listed when Cut lines is selected.
Records Available
Picking Tickets or Picking Sheets
Orders available for processing are ones which are:
- Not delivered
- Either an Original order or a Claim
- Have order lines in a cut status.
Use the find option  to decide which lines to process. Choices are Include Rolls, Include Items, and Include Services.

- If Include Rolls, Items, and Services are all checked, the Picking Sheet only shows Roll and Item Inventory but will post Rolls, Items, and Services.
- If the user decides to only check Include Rolls, for a Roll Report, then only Order Lines with Rolls will be posted. Then for a second report, only checks Include Items, then only Order Lines with Items will be posted. Services would be skipped entirely.
- Picking Tickets act the same always. So, if only Include Rolls is checked, but “Picking Tickets – Stage Orders” is used, only those Orders that have Roll Inventory to process will be selected, but all eligible Lines on the Order will be processed.
- Check Start Tagged to go to the browse with all the found orders tagged.
Work Orders
Orders available for processing are ones which are:
- Not delivered
- Either an Original order or a Claim
Cut Lines
Lines cut, (staged or delivered in ERRM) already will not be listed.
Use the find option to decide which lines to process. Choices are Include Rolls, Include Items, Include Services, and Ready to Cut Only.

- Choose to include rolls, items and services.
- If ready to cut only is chosen only lines ready to cut will display.
- If not chosen, Inventory Lines in “None”, “Gen PO”, “On Order” or “Reserved” Status will be displayed and the status will show in pink. These Lines cannot be tagged for processing. The intent here is alert the user that there are Lines in the target filter that are not ready in the event that these Lines were overlooked for ordering.
- Check Start Tagged to go to the browse with all the found lines tagged.
Toolbar
No editing is available from the toolbar.
 View highlighted order or line
 View lines on highlighted order.
 View notes on highlighted order or line
 Once records are tagged, use this button to start processing.
Find-Use to find a specific range of records or a specific record. Another way to access the Find screen is to click the Find Tab on the left hand side. This find works the same as the ones for Customer Orders and Quotes. The list stays when switching between processes until the batch processing screen is closed.
 Reset the browse list to include all records.
Tagging options
Records are selected to be processed by tagging. Left-click on a record or highlight a record and click the tag/untag button or Right Click and then click tag/untag. Using tag all is usually done after using the Find feature to narrow the list.
 Tag one
 Untag one
 Tag all
 Un Tag all
Once records are selected by tagging, clicking the Printer Button process batches.

Processing order is important!
Once a Line is Delivered / Staged, it cannot be picked up again unless the user sets the Line back to cut, so do not choose one of the selections to deliver lines if you want to run another picking document.
Picking Tickets
First, select a Process, and then click the Process button.
Regardless of which report Stages / Delivered the Roll Order Line, it will post to the Cutting Table if the proper switches are set.

Picking Sheet
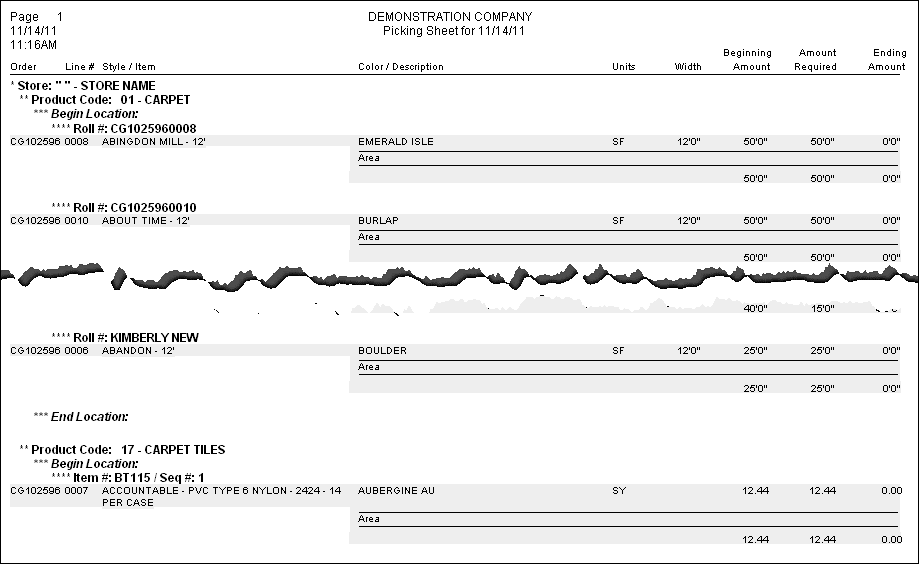
A picking sheet is a single long document listing all material lines that would have been on the individual picking tickets. If a picking sheet is going to be run, it must be done before the picking ticket is run and the line is changed to a delivered status.
There are three options when printing a picking sheet.
- Print the Sheet and leave the lines in a cut status (Do Not Deliver (Stage) Order Lines). This would be used if an individual picking ticket will be printed at a later time.
- Print the Sheet and change the lines to a delivered (Staged) status.
- If you only want to use Picking Sheet, then it is likely, you will want to use this option as it the lines are made ready for the next step; job costing in non-ERRM or delivery in ERRM.
- Print the Sheet, then Picking Tickets and deliver(Stage) the order lines.
Picking Ticket–Deliver (Stage) Order Lines
This selection prints individual picking tickets for the selected jobs and delivers (stages) the lines for those jobs. The tickets will be printed by Order number
Print Cuts
Check this box to include the Roll Cuts / Item Quantities with each unique Roll. These are in Order Number, Line Number The Picking Sheet’s usefulness multiplied because all the cuts will show the digression of the roll size or Item count.
Picking Date
This defaults to today’s date, but can be edited for example if printing the sheet for jobs to be staged the next day.
Preview
Check this box, to see what will be printed.
The information is sorted by Store Code, then Product Code, then location and finally Inventory number, making it more convenient to gather materials from the same area at the same time.
Confirm Picking Ticket-Batch Screen
While the options here are the same, selections here do not affect printing single picking tickets.
Work Orders
This selection prints individual work orders for the selected jobs. They will be printed by Order number. The options for the batch printing have are saved as a separate user option from the options for printing a single work order, so the two functions could have different options chosen.
Cut Lines
Tag the order lines to be cut.
To cut all the lines of one order, first use the Find feature to list only lines for that order, then Tag all.
It is necessary to confirm that tagged lines be cut.
Click the Print Button to process.

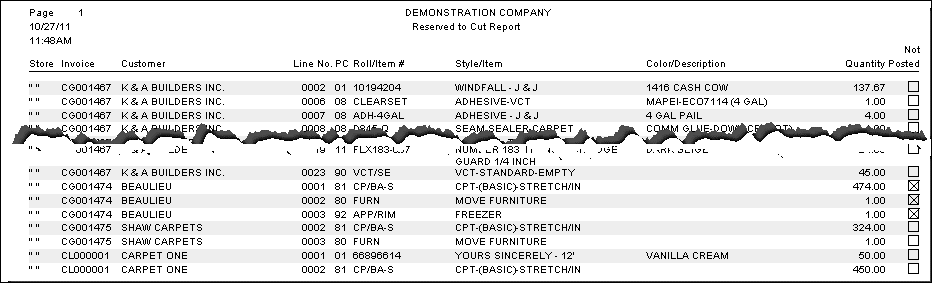
A report of the lines cut will be produced. If some of the lines could not be cut, for example if the order was opened by a user, they are marked not posted on the report with an X in the box.
Comments
Article is closed for comments.