This screen is also known as the order "header". In order to access this screen, click the Insert button from the Customer Order Screen. Information about the order is entered here. Additionally, individual line entries for products are entered on this screen as well. The following are explanations for each data entry field on this screen. To increase the speed of data entry, we highly recommend the use of the Hot Key functionality. Holding down the Alt key and pressing the underlined letter as shown on the field name may access each field. For example, to quickly jump to the Sales Rep #1 field, press Alt-R twice. Some letters may be used more than once and press the Alt- combination will go to the first occurrence of that hot key on the screen. If it is not the field desired, press the Alt combination again.
The following are explanations for each data entry field on this screen. Which of these fields is the starting point is determined by the selection in >Utilities>System Options>Order Entry>Order Entry>Order Entry Starting Position
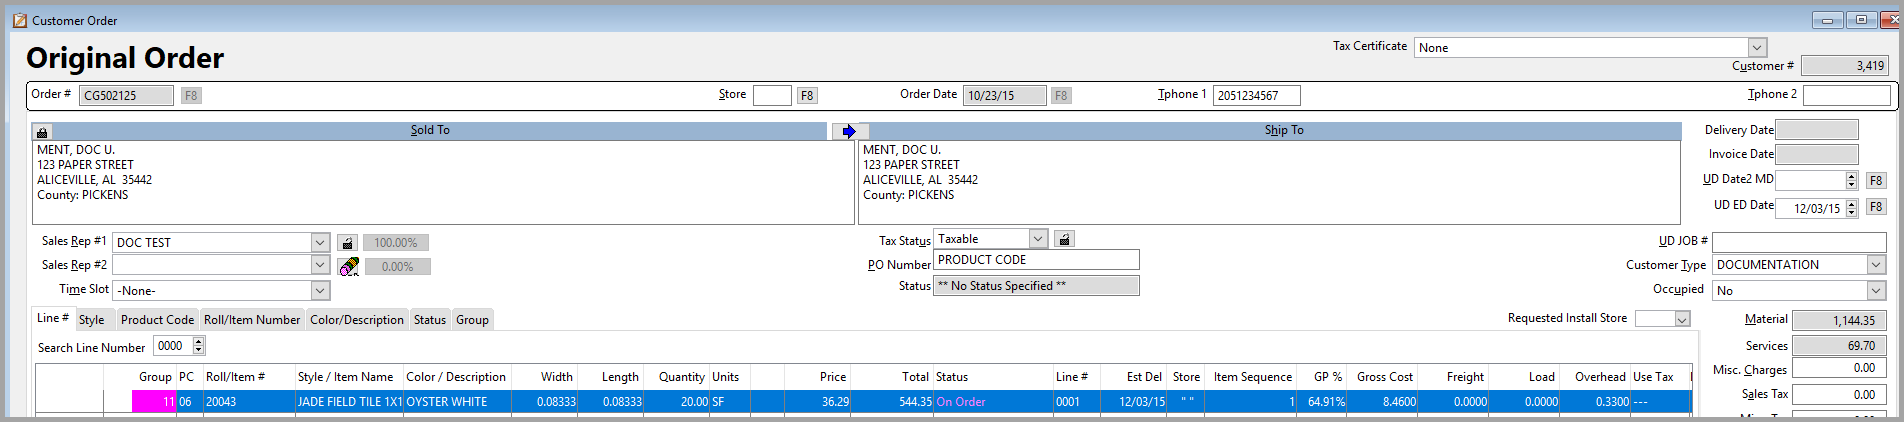
Order #
Pressing F8 at the Order Number field will produce a computer generated order number. Many users may want to produce an order number at point of sale or as the information is entered into the computer. The format of the number will be "CG100123". Each new number will be in sequence for a given calendar year. There may be up to 99,999 different orders entered for any one year before the system begins to repeat numbers. The format for the computer-generated number is as follows: "CG" means computer generated. That sequence of letters cannot be used with a manually entered order number. The first digit following "CG" represents the year of the decade. Then the sequence is from 00001 to 99999. Set the option >Utilities>System Options>System Wide>Purchase Orders>Only Allow Computer Generated Invoices and Quotes to yes to restrict the entry to only CG invoice numbers.
Store Code
Press the F8 button to access a list of available store codes. If a particular store code cannot be entered here, check >Utilities>System Options>Order Entry>Order Entry>Order Stores Visible to User. It may be set to not allow other store codes. Store code is a required entry. Hovering over the store code will give the store description.
Customer Number
If the customer number is known, enter it in this field and the customer information will be automatically filled in. Or, customer membership tags with customer number barcodes are printed this would be a good starting point for orders as the number can be scanned into this field.
Order Date
This is the date the order was actually written. The order date defaults to the system date. If using a computer generated invoice number as explained above, the system date will automatically be posted. This may be edited only if no payments or discounts have been posted. Click the F8 button to view the on-line calendar or click the up and down arrows to move forward or backward in one-day increments. To prevent the order date from being changed from the original, set >Utilities>System Options>Order Entry>Order Entry>Allow Editing of the Order Date to no. With this restriction, the order will always have the system date of the workstation.
Telephone Field #1
Typing in a phone number will go to the nearest telephone match in the customer list or an existing order and pull in the customer name, address and email.
Exporting from the customer list is recommended for the sake of consistency. This field is user definable and may not necessarily display "Telephone #1". The field label can be changed in >Utilities>System Options>System Wide>General>Telephone 1 Prompt.
Telephone Field #2
This field allows a second telephone number to be entered for this order. Similar to Telephone Field #1, the name of this field can be changed. Go to >Utilities>System Options>System Wide>General>Telephone 2 Prompt.
Sold To/Ship To
If a phone number was typed into the telephone number field and exported a customer name, this field will be automatically filled out. If not, position the cursor over the white area of this field making the cursor change to a pointing hand, double-click the mouse to bring up the customer information screen.
Comments
Article is closed for comments.