Full Order Entry Utilities User Guide
Order Entry>Utilities>Setup>Default Discount Level
Order Entry gives the ability to set up a pricing matrix for selling price discounts according to product codes.
The discount levels can be set up in one of three ways:
- Apply the discount levels (DEFAULT) to all customers.
- Apply the discount levels to a specific customer type.
- Apply the discount levels to an individual customer record.
This screen is where the discount percentages that should apply to specific product codes are specified. Levels can be set in one of the following ways:
- Create one discount percentage and apply it to ALL product codes.
- Create a few discount percentages and apply it to groups of product codes.
- Create discount percentages for each product code.
As many discount percentages as needed are possible but a product code can only be assigned to one discount level.
- To set up a pricing discount table that will be used as a DEFAULT, go to Utilities>Settings>Default Discount Levels.
- To setup up a pricing discount table for an individual customer go to File>Customers. Select the correct customer name and then click the Set the discount levels for the highlighted customer button
 .
.

The Default Discount Level calculation is figured on whatever selling price comes up on the customer order line. Be aware that if there are formulas set up in the Product module that are calculating discounts already, the default discount will be calculated on top of the formula price.
If using Discount Levels either default or customer level, the pricing levels from products will not display.
For example:
A product called Beautiful has a roll cost of 6.00 a square yard.
A formula is entered in price #1 on the products record that calculates a selling price that includes a 10% discount; let's say the discounted price equals $10.00 (normally $12.00).
If a discount level for carpet of 15% is applied, when a customer order line is entered, the 15% discount will be calculated on the $10.00 price, not the $12.00.
Take care when implementing this feature to be sure products are not being discounted twice.
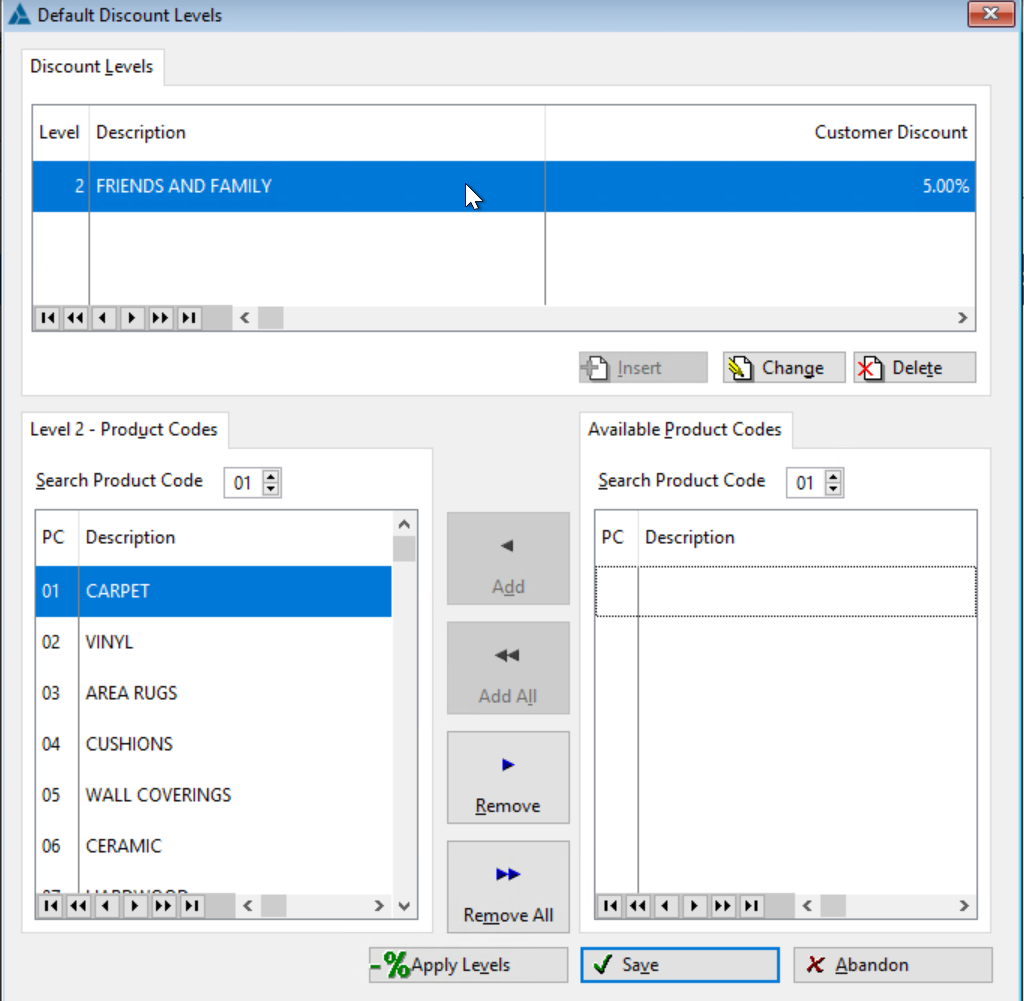
Discount Levels
The top of the screen displays the discount levels entered.
Adding Discount Levels
Order Entry>Utilities>Default Discount Level
This screen allows entering a description of the discount level and its corresponding discount percentage rate. As many levels as needed may be entered
Level Number: The level number is informational only and is assigned in sequential order. It does not have any connection to the price level functionality in Order Entry, nor does it relate to the price fields in the Products file. Click the Insert button to add a new level. At least one discount level has to be added before product codes can be assigned.
Description: Enter up to 30 characters to describe the discount. The description is used internally and does not print.
Discount Percentage: Enter a percentage amount for the discount. The percentage can be entered with 2 decimal places.
Available Product Codes
The right portion of the screen shows the list of product codes. This is where you select the product codes that you want included in the highlighted discount level. You can select as little as one product code or you can select all product codes.
Selection Buttons
Single click a product code description in the right column.
Click the add button to add just the selected product code. Highlight another product code and click add to also add it.
Click the products add all button to add all of the product codes to the discount level.
![]()
Once a product code has been selected, it moves from the right column to the left column. You can select a product code for ONE discount level only.
Use the Remove and Remove All buttons to unselect product codes to be discounted.
Apply Discount Levels
This button applies the discount table that is highlighted on the screen.
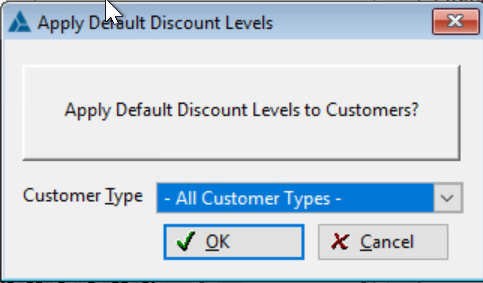
A second screen is displayed where you can either apply the discount table to all customers or you can select an individual customer type. Click the down arrow to select a customer type from the list. This would be useful, for example, if you have one discount structure in place for builder customers and another structure for retail, etc.
The customer types are added through File>Customer Type.
Save
Click the save button to save a new discount table or when you edit an existing table. If you want the levels to be active, you must APPLY the changes you have made by clicking the Apply button.
Abandon
Click the abandon button to close the discount level screen without keeping any changes made.
Applying Discounts to Individual Customers
With more than one pricing structure and used on a customer by customer basis, it is best not to apply the default discount levels like described above. Instead, do the following:
- Go to File>Customers.
- Search for the customer name and single click to select it.
- Click the Apply Discount Levels button located at the top of the screen.
- Create the discount structure that will be used for this customer. After everything is set, click the SAVE button to apply the discounts to the customer.
Checking Applied Discounts
To see what discount level structure is active for a particular customer:
- Go to File>Customers.
- Search for the customer name and single click to select it.
- Click the Apply Discount Levels button located at the top of the screen. The current discount level is shown.
Comments
Article is closed for comments.