File>General Ledger>Utilities>Install G/L
- The General Ledger must be installed before the first day of the first month needed to begin processing the General Ledger. The General Ledger can be closed at the end of the next full month.
- Run the Post Beginning Balances Procedure prior to the first Journal Close.
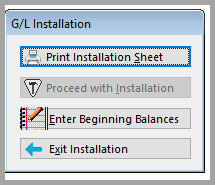
- Print Installation Sheet. The Installation Sheet will provide the information needed to set up the General Ledger.

• This procedure may ask for account codes that do not apply to a particular operation and that some stores may possibly never use. However, since the system is set up to handle circumstances in all states, create and install all account codes within given parameters.
• The procedures above will most likely have been done during the software implementation process.
Enter Beginning Balances
The beginning balances may be installed any time after the beginning of the first day of the next month after the General Ledger is installed. Regardless of when beginning balances are entered, the month and year of those balances must be entered.
For example, if the General Ledger is installed on December 15 but beginning balances are not prepared until February or March, at that time go back and enter the beginning balances as of January 1 and the system will carry forward all of the correct figures. Keep in mind, however, that in this example, closing the journal or obtaining financial statements for January will not be possible until those balances have been installed.
This selection will take a few seconds to create a new beginning balances file and then display a screen listing all installed account codes. Then edit the balances and post the beginning balance for each of the accounts.
Remember that credits must be entered as negatives and debits as positives. Please note that once beginning balances have been entered for a month the system will close out all other months automatically. So the first good month for general ledger purposes will the month beginning balances were entered.

1. Enter the month and year for beginning balances. __/__.
2. Now go through the chart of accounts and enter the correct beginning balance for each account.
3. Each account will be highlighted to enter in a beginning balance, if the account has a zero beginning balance simply press the down arrow to the next account.
4. The chart of accounts will be listed by store code. For example, with two store codes, store code 1 and store code 2, store code 1 will come up first and then scroll down the screen, and store code 2 accounts will appear. NOTE: All store codes share the same GL account codes. Enter in one set of chart of accounts and the system will split the information by store.
5. When finished entering the beginning balances the Balance Total on the screen should read zero. Remember Debits have to equal Credits. To check this, click the magnifying glass.
In a lot of instances, beginning balances come from accountants and finished they are not in balance. The difference is usually Retained Earnings. So if figures have been checked and re-checked ask the accountant if the difference should be entered in the retained earnings account code.
When satisfied with beginning balances and the balance total equals to zero, press the submit button. When asked to install the beginning balances for the month and year that specified earlier, answer yes.
After all of the beginning balances have been posted, print the chart of account balances and receive a printout of all accounts and beginning balances as posted.
Remember that beginning balances can be edited at any time up until the first Journal close.
Other Important Information
The General Ledger must be installed before the first day of the first month to begin processing the General Ledger. For example, to begin running the General Ledger on the 1st of January, the General Ledger must be installed sometime during the month of December. The beginning balances may be installed any time after the beginning of the 1st day of the month after the General Ledger is installed or elect to wait until some future month to run the first General Ledger. For example, if the General Ledger is installed on the 15th of December, the beginning balances can be posted anytime during the month of January, effective January 1. Once the balances have been posted, all data between the time the General Ledger was installed and the time the balances were effective (i.e. December 15 - 31st) will be eliminated automatically from the General Ledger file.
Beginning balances must be posted prior to the first journal close. The General Ledger can be closed at the end of the next full month after it has been installed. For example, the General Ledger is installed on the 15th of December; it may be closed on the 31st of January.
If on a network, no other workstations should be actively processing information during this installation.
1. Once the General Ledger has been installed, the only difference noticed in daily entries is that the system will require that applicable account codes be posted and will also require that the total of receipts generated equal the amount of deposit posted.
2. When trying to install the General Ledger, the receipt file may need to be cleaned up.
3. Go to Order Entry>File>Receipt Configuration
4. Click Edit to change an existing receipt file. In the field labeled "Last Receipt", click the F8 button. This gives the option to alter the ending receipt number. Doing so requires an access code from RFMS that is automatically changed every time the file is referenced. Prior to installing the General Ledger have on hand pertinent information regarding Chart of Accounts ranges. An installation information sheet can be printed out to review with an accountant to be sure that the correct numbers are entered.
Comments
Article is closed for comments.